Starting your backup process
1. Backing up folders from the helixee application installed on my computer
Once you are connected to the same network as your helixee (by cable or by Wi-Fi), you can launch your helixee desktop application.
- Log to the helixee to which you want to save data.
- Click on « Backup ».
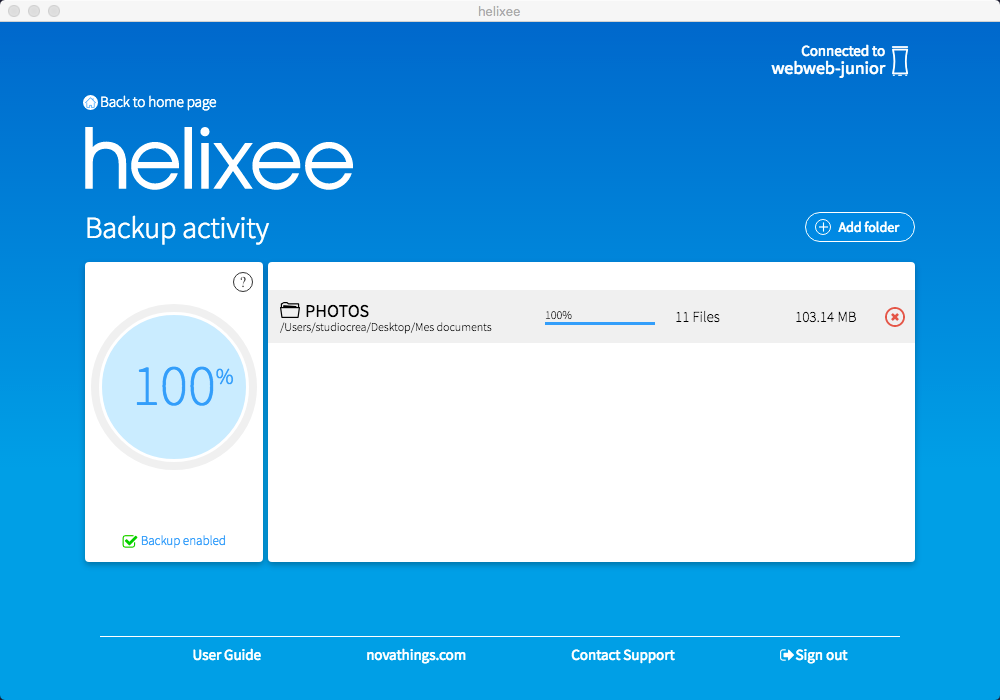
- On this page, you can add folders containing the files you want to back up. To do this, click on the button « Add a folder » (see the picture).
- A dialog window opens, go to the tree structure of your computer, until you select the desired folder, then click on « Open ».
- The folder is then added to the queue.
- Select the check box « Backup enabled » on the left below the percentage, then the transfer can start.
At the end of a transfer, you can delete the folder, by clicking on the red cross, the files will not be deleted from the helixee.
But this folder will no longer be automatically updated by helixee.
- To cancel a transfer, click on the red cross .
- To add another folder, click on the button Add folder.


WARNING !
The first backups will take additional time because helixee will encrypt your data while backing it up.
GOOD PRACTICE
The folders that you have added to the waiting list are continuously monitored when your helixee application is opened (helixee checks about every hour): if you add a new item to your helixee monitored folder, it will be automatically backed up.
2. Backing up folders from my.helixee.me thanks to the DropZone
WHAT IS MY DROP ZONE ON MY HELIXEE HARD DRIVE FOR?
This new section allows you to « drag and drop » files from a computer with a simple web browser, whether you are at home or remotely.
You can also create folders to store your data. The « Drop Zone » acts as a folder that you would have saved from your computer, with the PC/Mac application.
WARNING !
Note that when you delete files, they are temporarily stored in the Trash of the helixee (at the bottom of the main menu), for 30 days. After this period, they are permanently deleted.
Before the end of the delay, you can still restore them, if you wish.
You can also empty the recycle bin on demand by making « Select all » and « Delete permanently »
For more details, see the section on the bin.
WHAT IS THE DIFFERENCE BETWEEN THE « DROPZONE » AND « I SAVE », WHITCH IS EASIER TO USE?
Use the Drop Zone for fast local and remote file drop. There is no file monitoring, no automatic backup. With the desktop helixee application, any folders you add in the « I backup » section will be monitored and backed up automatically.

3. Backing up your data from your smatphone or tablet
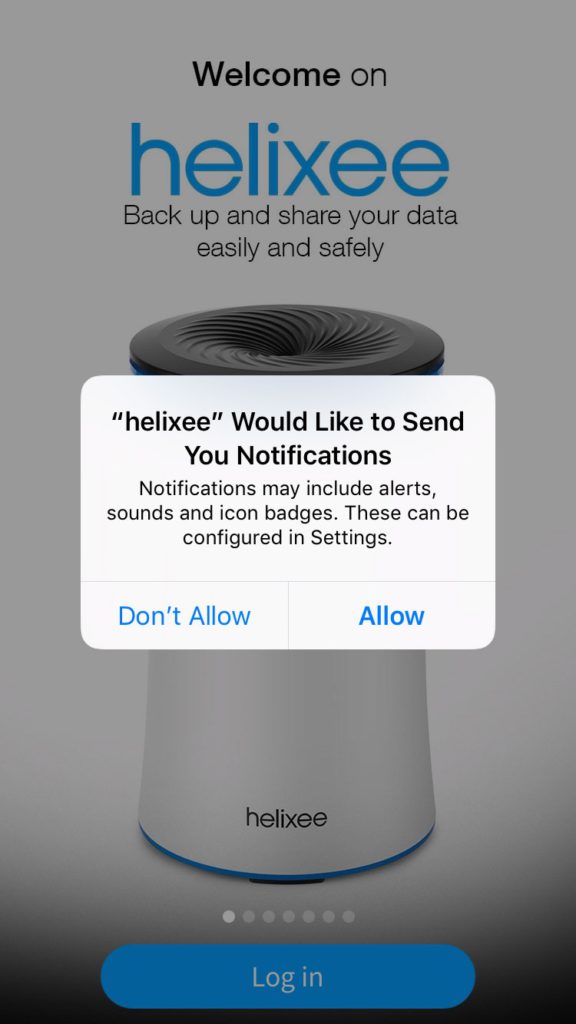
To make your first backup of your iOS or Android device data (smartphone or tablet):
Open the helixee application
You will answer the following questions:
- Do you want to allow helixee to send you notifications ? Notifications can include alerts, sounds, and icon tags.
You can configure them in the Settings (of your device).
We advise you to allow these alerts, in order to receive notifications related to spheres sharing, as well as the activity on your helixee.
Then press « Login« ,
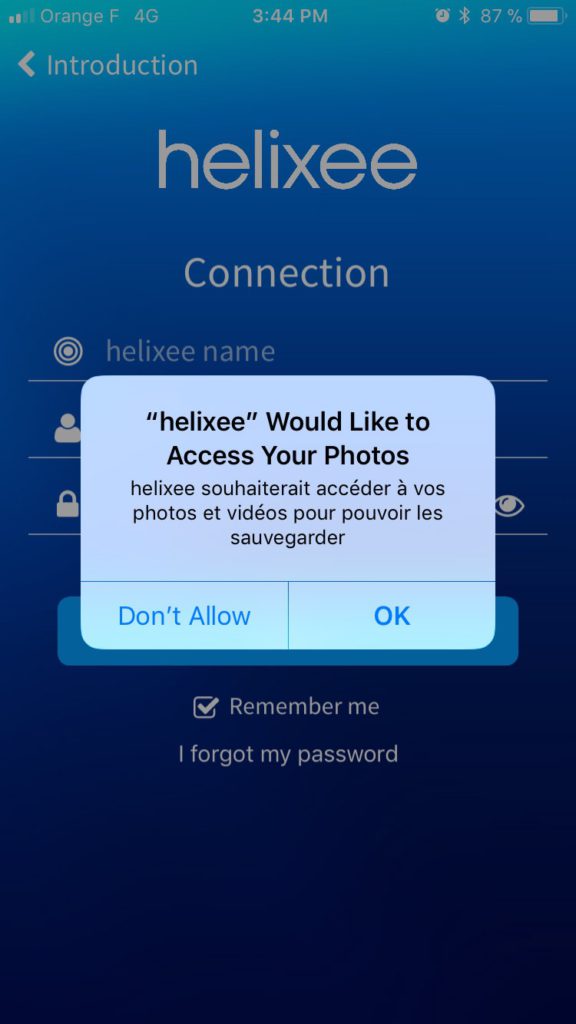
Other permissions will be displayed:
- helixee would like to access your photos: helixee would like to access your photos and videos to be able to save them.
Click « OK » if you want to save your photos and videos. - helixee would like to access your contacts: helixee would like to access your contacts in order to save them.
Click « OK » if you want to save your contacts.
NOTE : You will be able to change your mind in the application settings.

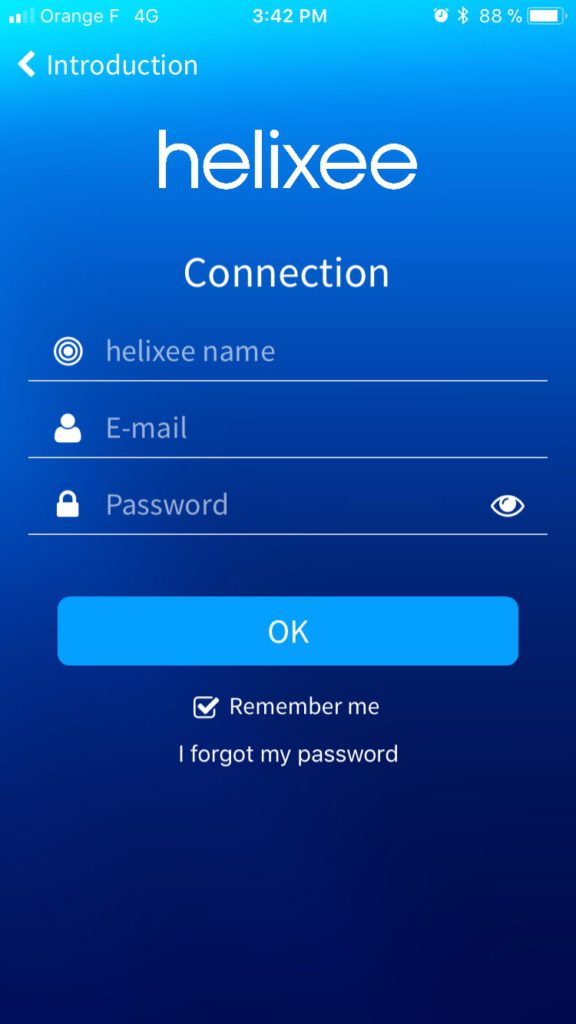
LOG IN
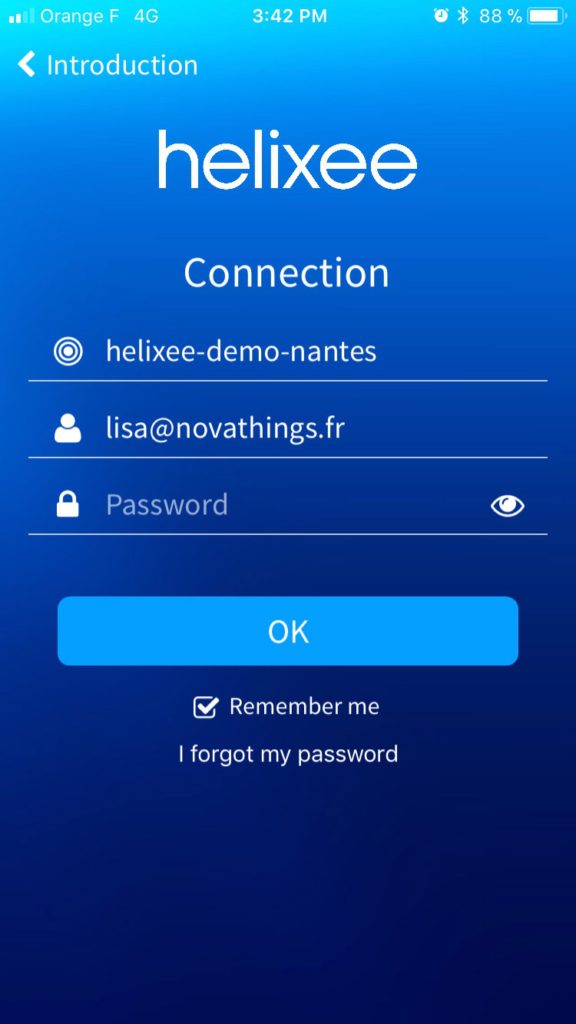
Then to log into your helixee, enter the authentication information you entered when creating your account.
If you have forgot them, please refer to the confirmation email sent to you at the end of registration, with the subject line: »helixee – Installation confirmation of « XXX » ».
It will provide:
- The name of your helixee
- Your email address
- Your password
TIP !
Before validating the login form, verify the accuracy of your password by clicking on the eye . This can help you avoid typing errors.
Once you have entered all your information,
- Check the box « Remember me« , this will prevent you from entering this information each time you log in,
- Click on the « OK » button to finalize.
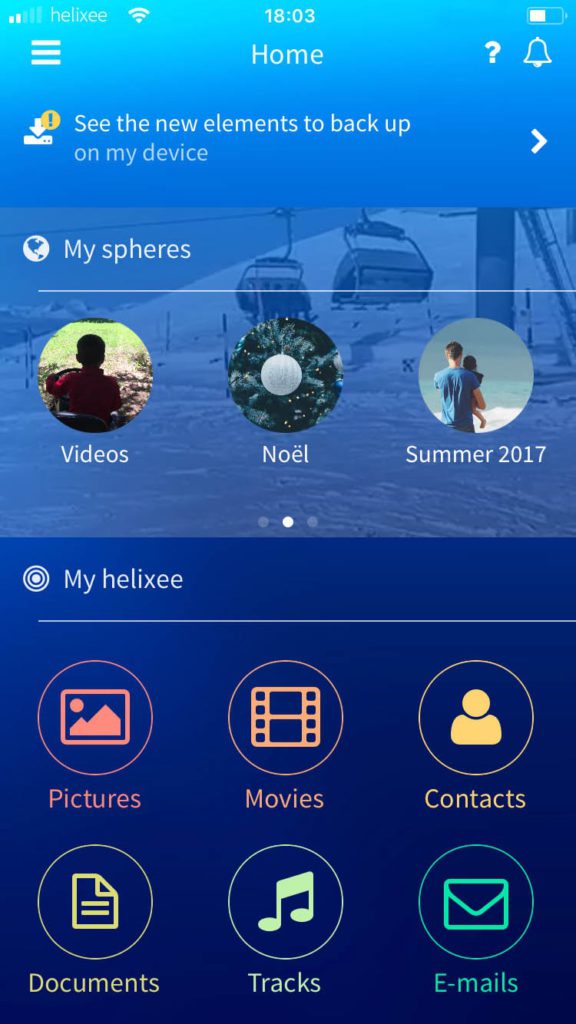
You will then arrive on the home page, from this page you have access to:
- To the backup-ready files: video photos and contact ready to be backed up
- To your spheres: the items you want to share will be in these folders
- To the « My helixee » section: shortcuts to your data sorted by type.
STARTING YOUR FIRST BACKUP
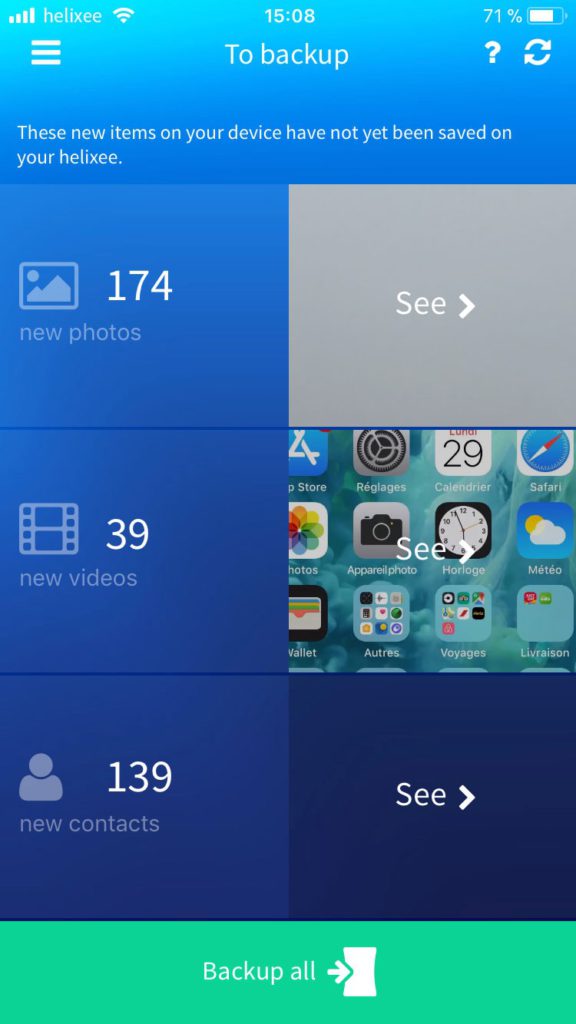
From the home page, press the button : « See the new elements to back up ». The helixee application will scan your device and detect new data.
From any page of the application, access this section from the main menu by clicking on the icon, then the « to backup » section.
You can view all the new data (photos, videos and contacts) and start a backup by pressing the « Save » button.
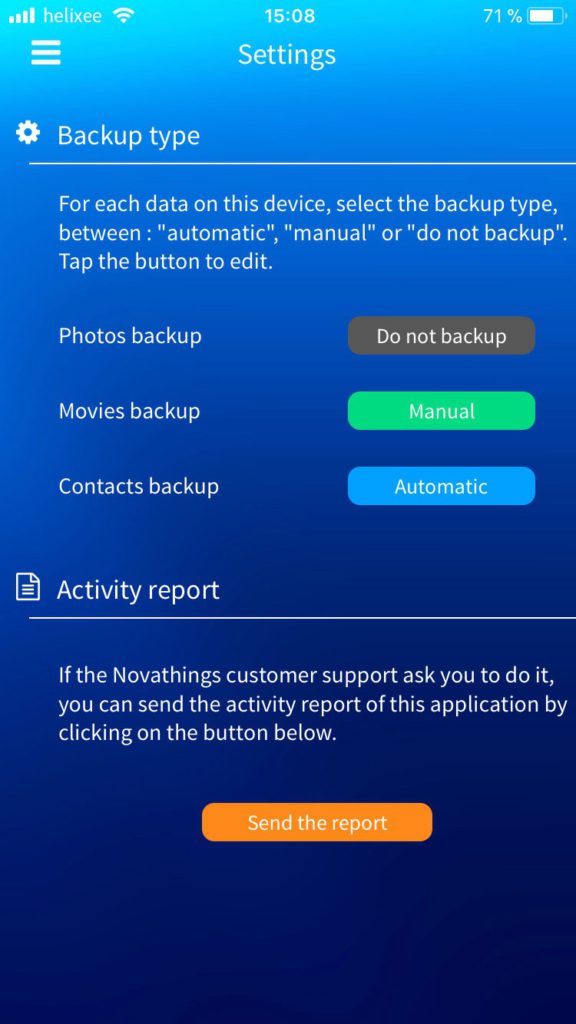
By default, the backup of your data is in « Manual » mode. This means that you have to start a backup manually to back up your data on your helixee.
To set up an automatic backup or change the backup mode from your device, go to the helixee application:
- Open the main menu by clicking on the icon, then « Settings ».
- In the « Backup Types » tab, press the Manual button in front of « Picture Backup »,« Video Backup » and « Contact Backup » to select a manual, automatic or « Do not backup ».
WARNING !
- To back up data, ensure that your device is connected to the same network as the one helixee is connected to.
- When you make your first backup or when you have a lot of data to back up, the backup time can take longer.
You can stop the backup at any time by pressing « Stop » and resume it later.
To automatically back up the data on your iOS device, you must enable automatic backup.
4. Setting up an automatic backup
To set up an automatic backup of your Mac or Windows computer
- Go to the helixee application on your computer
- Click Backup from the main menu and then click Add Folder
- In the window that opens, choose a folder you want to save and click Select a folder
Once you have added all the folders you want to backup, you can close the helixee application window. It will run in the background to back up your data. Backing up your data is automatic. Folder scans are done every hour. Once you have selected the folders you want to back up and enabled backup, everything is in place, no further action is required.
WARNING !
Your computer must be connected to the same network as your helixee or directly to the helixee Wi-Fi Hotspot in order to be able to do your back-up.
To set up an automatic backup of your iOS or Android device
By default, the backup of your data is in « Manual » mode. This means that you have to start a backup manually to back up your data on your helixee.
To make your first backup of your iOS or Android device data (smartphone or tablet):
- Open the main menu and press Settings
- In the « General » tab, press the Manual button in front of « Picture Backup »,« Video Backup » and « Contact Backup » to select a manual, automatic or do not backup.
LOG IN
- Then go to the helixee application from your iOS device
- Open the main menu and press Save. The helixee application will scan your device and detect new data.
- By default, you can view all the new data (pictures, videos and contacts) and start a backup by pressing Save.
WARNING !
To back up data, make sure your device is connected to the Internet via a Wi-Fi network.
GOOD PRACTICE
When you make your first backup or when you have a lot of data to back up, the backup time may be long. You can stop the backup at any time by pressing « Stop » and resume it later.
To automatically back up the data on your iOS device, you must enable automatic backup.